0%

阿布扎比无人机项目

一次参加阿布扎比机器人大赛の记录

比赛分为三个部分,巡线,避障和跟随目标。

无人机巡线

巡线部分识别线条颜色进行跟随。

RGB->HSV

RGB颜色分类通过三种颜色通道(R红、G绿、B蓝)的变化以及之间的叠加来得到各种各样的颜色。采用RGB方式编码,所有的颜色都可以用这三个颜色分量来表示。

这样编码方式几乎可以得到人眼能够感知到的所有颜色。但是三种颜色分量的值随着环境亮度的变化会有很大的变化。为了克服不同颜色分量在不同环境亮度下数值的波动,可以采用一种新的编码方式HSV。

HSV颜色模型使用H色调、S饱和度、V明度三种颜色参数。使用这种颜色模型的好处是亮度由V名都参数表示,H色调不受亮度而波动。

1
2
#将图像转化为HSV格式
img_hsv = cv2.cvtColor(img, cv2.COLOR_BGR2HSV)

原图
HSV

补充资料:
从 RGB 到 HSV 的转换详细介绍
在Python中使用OpenCV将RGB格式的图像转换为HSV格式的图像
此外,根据目标颜色的HSV数值,我们设定一个HSV范围。在这个范围内的像素点是我们的目标像素点,范围之外的像素点则排除。

1
2
3
4
5
#设定颜色HSV数值范围
#np.array存储数组更加高效
sensitivity = 20
blue_lower = np.array([120-sensitivity,100,100])
blue_upper = np.array([120+sensitivity,255,255])

二值化

根据颜色我们找出目标线条,目标线条以外的所有物体都可以被忽略。这一步我们用1标注我们的目标,用0标注目标意外的所有物体。

1
2
3
4
5
6
7
8
#去除颜色范围外的其他颜色
img_mask = cv2.inRange(img_hsv,blue_lower,blue_upper)
cv_show(img_mask)
cv2.imwrite('IMG_MASK.jpg',img_mask)
#二值化操作
ret,img_binary = cv2.threshold(img_mask, 0, 255, cv2.THRESH_BINARY)
cv_show(img_binary)
cv2.imwrite('IMG_Bin.jpg',img_binary)

BINARY

碎片填补

图片经过二值化,仍然存在黑色空洞。原因是拍摄时部分位置反光严重,使图片上呈现高亮度的白色。通过判断白色区域是否为连通区域。如果是,则连通区域内包含的黑色区域也处理为白色区域。

1
2
3
4
5
6
7
8
9
10
11
12
13
14
15
16
17
18
19
20
21
22
23
24
25
#碎片填充
def FillHole(img,SavePath):
im_in = img
# 复制 im_in 图像
im_floodfill = im_in.copy()
# Mask 用于 floodFill,官方要求长宽+2
h, w = im_in.shape[:2]
mask = np.zeros((h+2, w+2), np.uint8)
# floodFill函数中的seedPoint必须是背景
isbreak = False
for i in range(im_floodfill.shape[0]):
for j in range(im_floodfill.shape[1]):
if(im_floodfill[i][j]==0):
seedPoint=(i,j)
isbreak = True
break
if(isbreak):
break
# 得到im_floodfill
cv2.floodFill(im_floodfill, mask, seedPoint, 255);
# 得到im_floodfill的逆im_floodfill_inv
im_floodfill_inv = cv2.bitwise_not(im_floodfill)
# 把im_in、im_floodfill_inv这两幅图像结合起来得到前景
im_out = im_in | im_floodfill_inv
cv2.imwrite(SavePath, im_out)

fillhole
补充链接->python_opencv实现图像分割孔洞填充后处理

轮廓提取

跟随控制线

跟踪小球

如何让机器人识别面前的绿色小球并且进行自动跟随?

先把问题拆成两个子问题。第一,识别绿色小球;第二,自动跟随。

目标识别

目标识别分为三步:

  1. 图像预处理(定义结构元素,HSV 转换,腐蚀与膨胀)
  2. 轮廓检测
  3. 矩形绘制

图像预处理

1
2
# 定义结构化元素
kernel = cv2.getStructuringElement(cv2.MORPH_RECT,(5,5))

我们使用cv2.getStructuringElement函数生成结构化元素。
该函数需要两个参数。第一个参数,控制元素的形状。第二个参数,控制元素的大小。
详细用法指路——> opencv-python结构化元素cv2.getStructuringElement()

1
2
3
4
5
6
7
8
9
10
11
12
13
14
15
16
17
18
19
20
21
22
23
24
25
26
27
28
29
# 设定颜色HSV数值范围
sensity = 10
green_lower = np.array([50-sensity,43,46])
green_upper = np.array([60+sensity,255,255])
# 将图像转成HSV颜色空间
hsv_frame = cv2.cvtColor(img, cv2.COLOR_BGR2HSV)
# 基于颜色的物体提取
mask = cv2.inRange(hsv_frame, green_lower,green_upper)
mask2 = cv2.morphologyEx(mask, cv2.MORPH_OPEN, kernel)
mask3 = cv2.morphologyEx(mask2, cv2.MORPH_CLOSE, kernel)
# 缝隙填充
mask4 = FillHole(mask3)
mask5 = cv_erodedAndDilated(mask4)
# 轮廓检测
cnt,heridency = cv2.findContours(mask5,
cv2.RETR_EXTERNAL,
cv2.CHAIN_APPROX_SIMPLE)
# 使用面积最大区域
maxArea = 0
maxIndex = 0
for i, j in enumerate(cnt):
area = cv2.contourArea(j)
if area > maxArea:
maxArea = area
maxIndex = i
cv2.drawContours(img,cnt,maxIndex,(255,0,255),10)
# x,y是矩阵左上点的坐标,w,h是矩阵的宽和高
x, y, w, h = cv2.boundingRect(np.array(cnt[maxIndex]))
cv2.rectangle(img, (x, y), (x+w, y+h), (0, 255, 0), 2)

使用cv2.boundingRect函数报错的解决方法——>python报错error: (-215:Assertion failed) npoints >= 0 && (depth == CV_32F || depth == CV_32S) in function boundingRect

运动控制

运动控制分为四步:

  1. 定义标准位置与大小
  2. 方位判断
  3. 速度控制

定义标准位置与大小

把标准位置定义在相机中心,标准大小可以自行设置需要的像素点。

1
2
3
4
5
6
7
8
9
10
# 定义标准位置
height,width,layer = img.shape
center_x = height/2
center_y = width/2
# 定义标准距离下目标物体大小
# 960*720 = 691200
size = 6000
area = w*h
robot_x = x+w/2
robot_y = y+h/2

方位判断

在无人机的飞行过程中,通过不断比较目标位置与标准位置,来判断无人机的方位。

1
2
3
4
5
6
7
8
9
10
11
12
13
14
15
16
17
18
19
20
21
22
23
24
25
26
27
28
29
30
31
32
33
# 定义方向变量
left_sign = 0
right_sign = 0
forward_sign = 0
up_sign = 0
down_sign = 0
# 判断前后速度
if area < size and area > size-2000:
forward_sign = 1
elif area > size-4000 and area <= size-2000:
forward_sign = 2
elif area <= size-4000 and size > 0:
forward_sign = 3
if area >= size and area < size+100000:
forward_sign = -1
elif area >= size+100000 and area < size+300000:
forward_sign = -2
elif area > size+300000:
forward_sign = -3
# 判断左侧横向速度
if robot_x < center_x and robot_x > center_x-120:
left_sign = 1
elif robot_x <= center_x-120 and robot_x >= center_x-240:
left_sign = 2
elif robot_x < center_x-240:
left_sign =3
# 判断右侧横向速度
if robot_x > center_x and robot_x < center_x+120:
right_sign = 1
elif robot_x >= center_x+120 and robot_x <= center_x+240:
right_sign = 2
elif robot_x > center_x+240:
right_sign =3

速度控制

无人机遥控有四个杆量,横滚、俯仰、油门、偏航。这四个杆量表示飞机运动的四个自由度。
在这里插入图片描述

横滚,控制无人机左右移动;
俯仰,控制无人机前后移动;
油门,控制无人机高度;
偏航,控制无人机水平方向的角度;

1
2
3
4
5
6
7
8
9
10
11
12
13
14
15
16
17
18
19
20
21
22
23
24
25
26
27
28
29
30
31
32
33
34
35
36
37
38
39
40
41
42
"""
控制飞机遥控器的四个杆量
参数:
a – float:[-100, 100] 横滚
b – float:[-100, 100] 俯仰
c – float:[-100, 100] 油门
d – float:[-100, 100] 偏航
"""
# 设定杆量参数集
a_level = [25,35,45]
b_level_forward = [15,25,40]
b_level_backward = [-30,-45,-60]
# # 控制前后进
if forward == 1:
tl_flight.rc(b=b_level_forward[0])
elif forward == 2:
tl_flight.rc(b=b_level_forward[1])
elif forward == 3:
tl_flight.rc(b=b_level_forward[2])
elif forward == 0:
tl_flight.rc(b=0)
elif forward == -1:
tl_flight.rc(b=b_level_backward[0])
elif forward == -2:
tl_flight.rc(b=b_level_backward[1])
elif forward == -3:
tl_flight.rc(b=b_level_backward[2])
# 控制左右向
if left == 1:
tl_flight.rc(a=-a_level[0])
elif left == 2:
tl_flight.rc(a=-a_level[1])
elif left == 3:
tl_flight.rc(a=-a_level[2])
elif right == 1:
tl_flight.rc(a=a_level[0])
elif right == 2:
tl_flight.rc(a=a_level[1])
elif right == 3:
tl_flight.rc(a=a_level[2])
elif right == 0 and left == 0:
tl_flight.rc(a=0)

代码汇总

1
2
3
4
5
6
7
8
9
10
11
12
13
14
15
16
17
18
19
20
21
22
23
24
25
26
27
28
29
30
31
32
33
34
35
36
37
38
39
40
41
42
43
44
45
46
47
48
49
50
51
52
53
54
55
56
57
58
59
60
61
62
63
64
65
66
67
68
69
70
71
72
73
74
75
76
77
78
79
80
81
82
83
84
85
86
87
88
89
90
91
92
93
94
95
96
97
98
99
100
101
102
103
104
105
106
107
108
109
110
111
112
113
114
115
116
117
118
119
120
121
122
123
124
125
126
127
128
129
130
131
132
133
134
135
136
137
138
139
140
141
142
143
144
145
146
147
148
149
150
151
152
153
154
155
156
157
158
159
160
161
162
163
164
165
166
167
168
169
170
171
172
173
174
175
176
177
178
179
180
181
182
183
184
185
186
187
188
189
190
191
192
193
194
195
196
197
198
199
200
201
202
203
204
205
206
207
208
209
210
211
212
213
# -*- coding: utf-8 -*-
import time
from robomaster import robot,battery
from robomaster import camera
import cv2
import numpy as np
import sys
sys.path.append(r'P:\Python\cv2') # 这里是我的路径,你的路径会不一样
from string_recognise_self import cv_show,FillHole,cv_drawContours,cv_center,cv_erodedAndDilated

"""碎片填充"""
def FillHole(img,SavePath='img_fillhole.jpg'):
img_in = img
# 复制 im_in 图像
img_floodfill = img_in.copy()
# Mask 用于 floodFill,官方要求长宽+2
h, w = img_in.shape[:2]
mask = np.zeros((h+2, w+2), np.uint8)
# floodFill函数中的seedPoint必须是背景
isbreak = False
for i in range(img_floodfill.shape[0]):
for j in range(img_floodfill.shape[1]):
if(img_floodfill[i][j]==0):
seedPoint=(i,j)
isbreak = True
break
if(isbreak):
break
# 得到im_floodfill
cv2.floodFill(img_floodfill, mask, seedPoint, 255);
# 得到im_floodfill的逆im_floodfill_inv
img_floodfill_inv = cv2.bitwise_not(img_floodfill)
img_out = img_in | img_floodfill_inv
cv2.imwrite(SavePath, img_out)
return img_out

"""腐蚀与膨胀"""
def cv_erodedAndDilated(img):
# 定义结构化元素
size = 20
kernel = cv2.getStructuringElement(cv2.MORPH_RECT,(size,size))
# 腐蚀图像
eroded = cv2.erode(img, kernel)
# 膨胀图像
img_dilated = cv2.dilate(eroded, kernel)
return img_dilated

"""小球位置识别"""
def cv_center(img):
# 定义结构化元素
kernel = cv2.getStructuringElement(cv2.MORPH_RECT,(5,5))
# 定义标准位置
height,width,layer = img.shape
center_x = height/2
center_y = width/2
# 设定颜色HSV数值范围
sensity = 10
green_lower = np.array([50-sensity,43,46])
green_upper = np.array([60+sensity,255,255])
# 将图像转成HSV颜色空间
hsv_frame = cv2.cvtColor(img, cv2.COLOR_BGR2HSV)
# 基于颜色的物体提取
mask = cv2.inRange(hsv_frame, green_lower,green_upper)
mask2 = cv2.morphologyEx(mask, cv2.MORPH_OPEN, kernel)
mask3 = cv2.morphologyEx(mask2, cv2.MORPH_CLOSE, kernel)
# 缝隙填充
mask4 = FillHole(mask3)
mask5 = cv_erodedAndDilated(mask4)
# 轮廓检测
cnt,heridency = cv2.findContours(mask5,
cv2.RETR_EXTERNAL,
cv2.CHAIN_APPROX_SIMPLE)
if cnt == []:
continue
# 找出面积最大区域
maxArea = 0
maxIndex = 0
for i, j in enumerate(cnt):
area = cv2.contourArea(j)
if area > maxArea:
maxArea = area
maxIndex = i
cv2.drawContours(img,cnt,maxIndex,(255,0,255),10)
# x,y是矩阵左上点的坐标,w,h是矩阵的宽和高
x, y, w, h = cv2.boundingRect(np.array(cnt[maxIndex]))
cv2.rectangle(img, (x, y), (x+w, y+h), (0, 255, 0), 2)
# 定义标准距离下目标物体大小
# 960*720 = 691200
size = 6000
area = w*h
robot_x = x+w/2
robot_y = y+h/2
# 定义方向变量
left_sign = 0
right_sign = 0
forward_sign = 0
up_sign = 0
down_sign = 0
# 判断前后速度
if area < size and area > size-2000:
forward_sign = 1
elif area > size-4000 and area <= size-2000:
forward_sign = 2
elif area <= size-4000 and size > 0:
forward_sign = 3
if area >= size and area < size+100000:
forward_sign = -1
elif area >= size+100000 and area < size+300000:
forward_sign = -2
elif area > size+300000:
forward_sign = -3
# 判断左侧横向速度
if robot_x < center_x and robot_x > center_x-120:
left_sign = 1
elif robot_x <= center_x-120 and robot_x >= center_x-240:
left_sign = 2
elif robot_x < center_x-240:
left_sign =3
# 判断右侧横向速度
if robot_x > center_x and robot_x < center_x+120:
right_sign = 1
elif robot_x >= center_x+120 and robot_x <= center_x+240:
right_sign = 2
elif robot_x > center_x+240:
right_sign =3
# 判断飞机飞行高度
# 没有必要,因为小球的高度是固定
# 如果想要进行高度判断,这其实是一个难点。因为目标物在前后和上下两个维度上的移动
# 都会导致y坐标的变化。y坐标变化的因素有两个,需要把这两个因素综合考虑。
return forward_sign,left_sign,right_sign

if __name__ == '__main__':
tl_drone = robot.Drone()
# 指定连接方式为AP 直连模式
tl_drone.initialize()
tl_flight = tl_drone.flight
tl_camera = tl_drone.camera
tl_battery = tl_drone.battery
# 获取飞机电量信息
print('battery=\t'+str(tl_battery.get_battery())+'%')
cnt = []
# 获取飞机机身温度
print(tl_drone.get_temp())
# 控制飞机起飞
tl_flight.takeoff().wait_for_completed()
# 控制飞机飞行,单位cm
# 设置飞机帧率
tl_camera.set_fps(fps='high')
# 设置飞机码率
tl_camera.set_bitrate(bitrate=6)
# 设置飞机分辨率
tl_camera.set_resolution(resolution='high')
# 获取视频流
tl_camera.start_video_stream(display=False)
try:
while True:
img = tl_camera.read_cv2_image(strategy='newest')
forward,left,right = cv_center(img)
"""
控制飞机遥控器的四个杆量
参数:
a – float:[-100, 100] 横滚
b – float:[-100, 100] 俯仰
c – float:[-100, 100] 油门
d – float:[-100, 100] 偏航
"""
# 设定杆量参数集
a_level = [25,35,45]
b_level_forward = [15,25,40]
b_level_backward = [-30,-45,-60]
# # 控制前后进
if forward == 1:
tl_flight.rc(b=b_level_forward[0])
elif forward == 2:
tl_flight.rc(b=b_level_forward[1])
elif forward == 3:
tl_flight.rc(b=b_level_forward[2])
elif forward == 0:
tl_flight.rc(b=0)
elif forward == -1:
tl_flight.rc(b=b_level_backward[0])
elif forward == -2:
tl_flight.rc(b=b_level_backward[1])
elif forward == -3:
tl_flight.rc(b=b_level_backward[2])
# 控制左右向
if left == 1:
tl_flight.rc(a=-a_level[0])
elif left == 2:
tl_flight.rc(a=-a_level[1])
elif left == 3:
tl_flight.rc(a=-a_level[2])
elif right == 1:
tl_flight.rc(a=a_level[0])
elif right == 2:
tl_flight.rc(a=a_level[1])
elif right == 3:
tl_flight.rc(a=a_level[2])
elif right == 0 and left == 0:
tl_flight.rc(a=0)
time.sleep(0.08)
cv2.namedWindow('Drone', 0)
cv2.imshow("Drone", img)
cv2.waitKey(10)
tl_flight.rc(a=0,b=0,c=0,d=0)
except KeyboardInterrupt:
pass
cv2.destroyAllWindows()
tl_camera.stop_video_stream()
# 控制飞机降落
tl_flight.land().wait_for_completed()
# 关闭无人机对象
tl_drone.close()

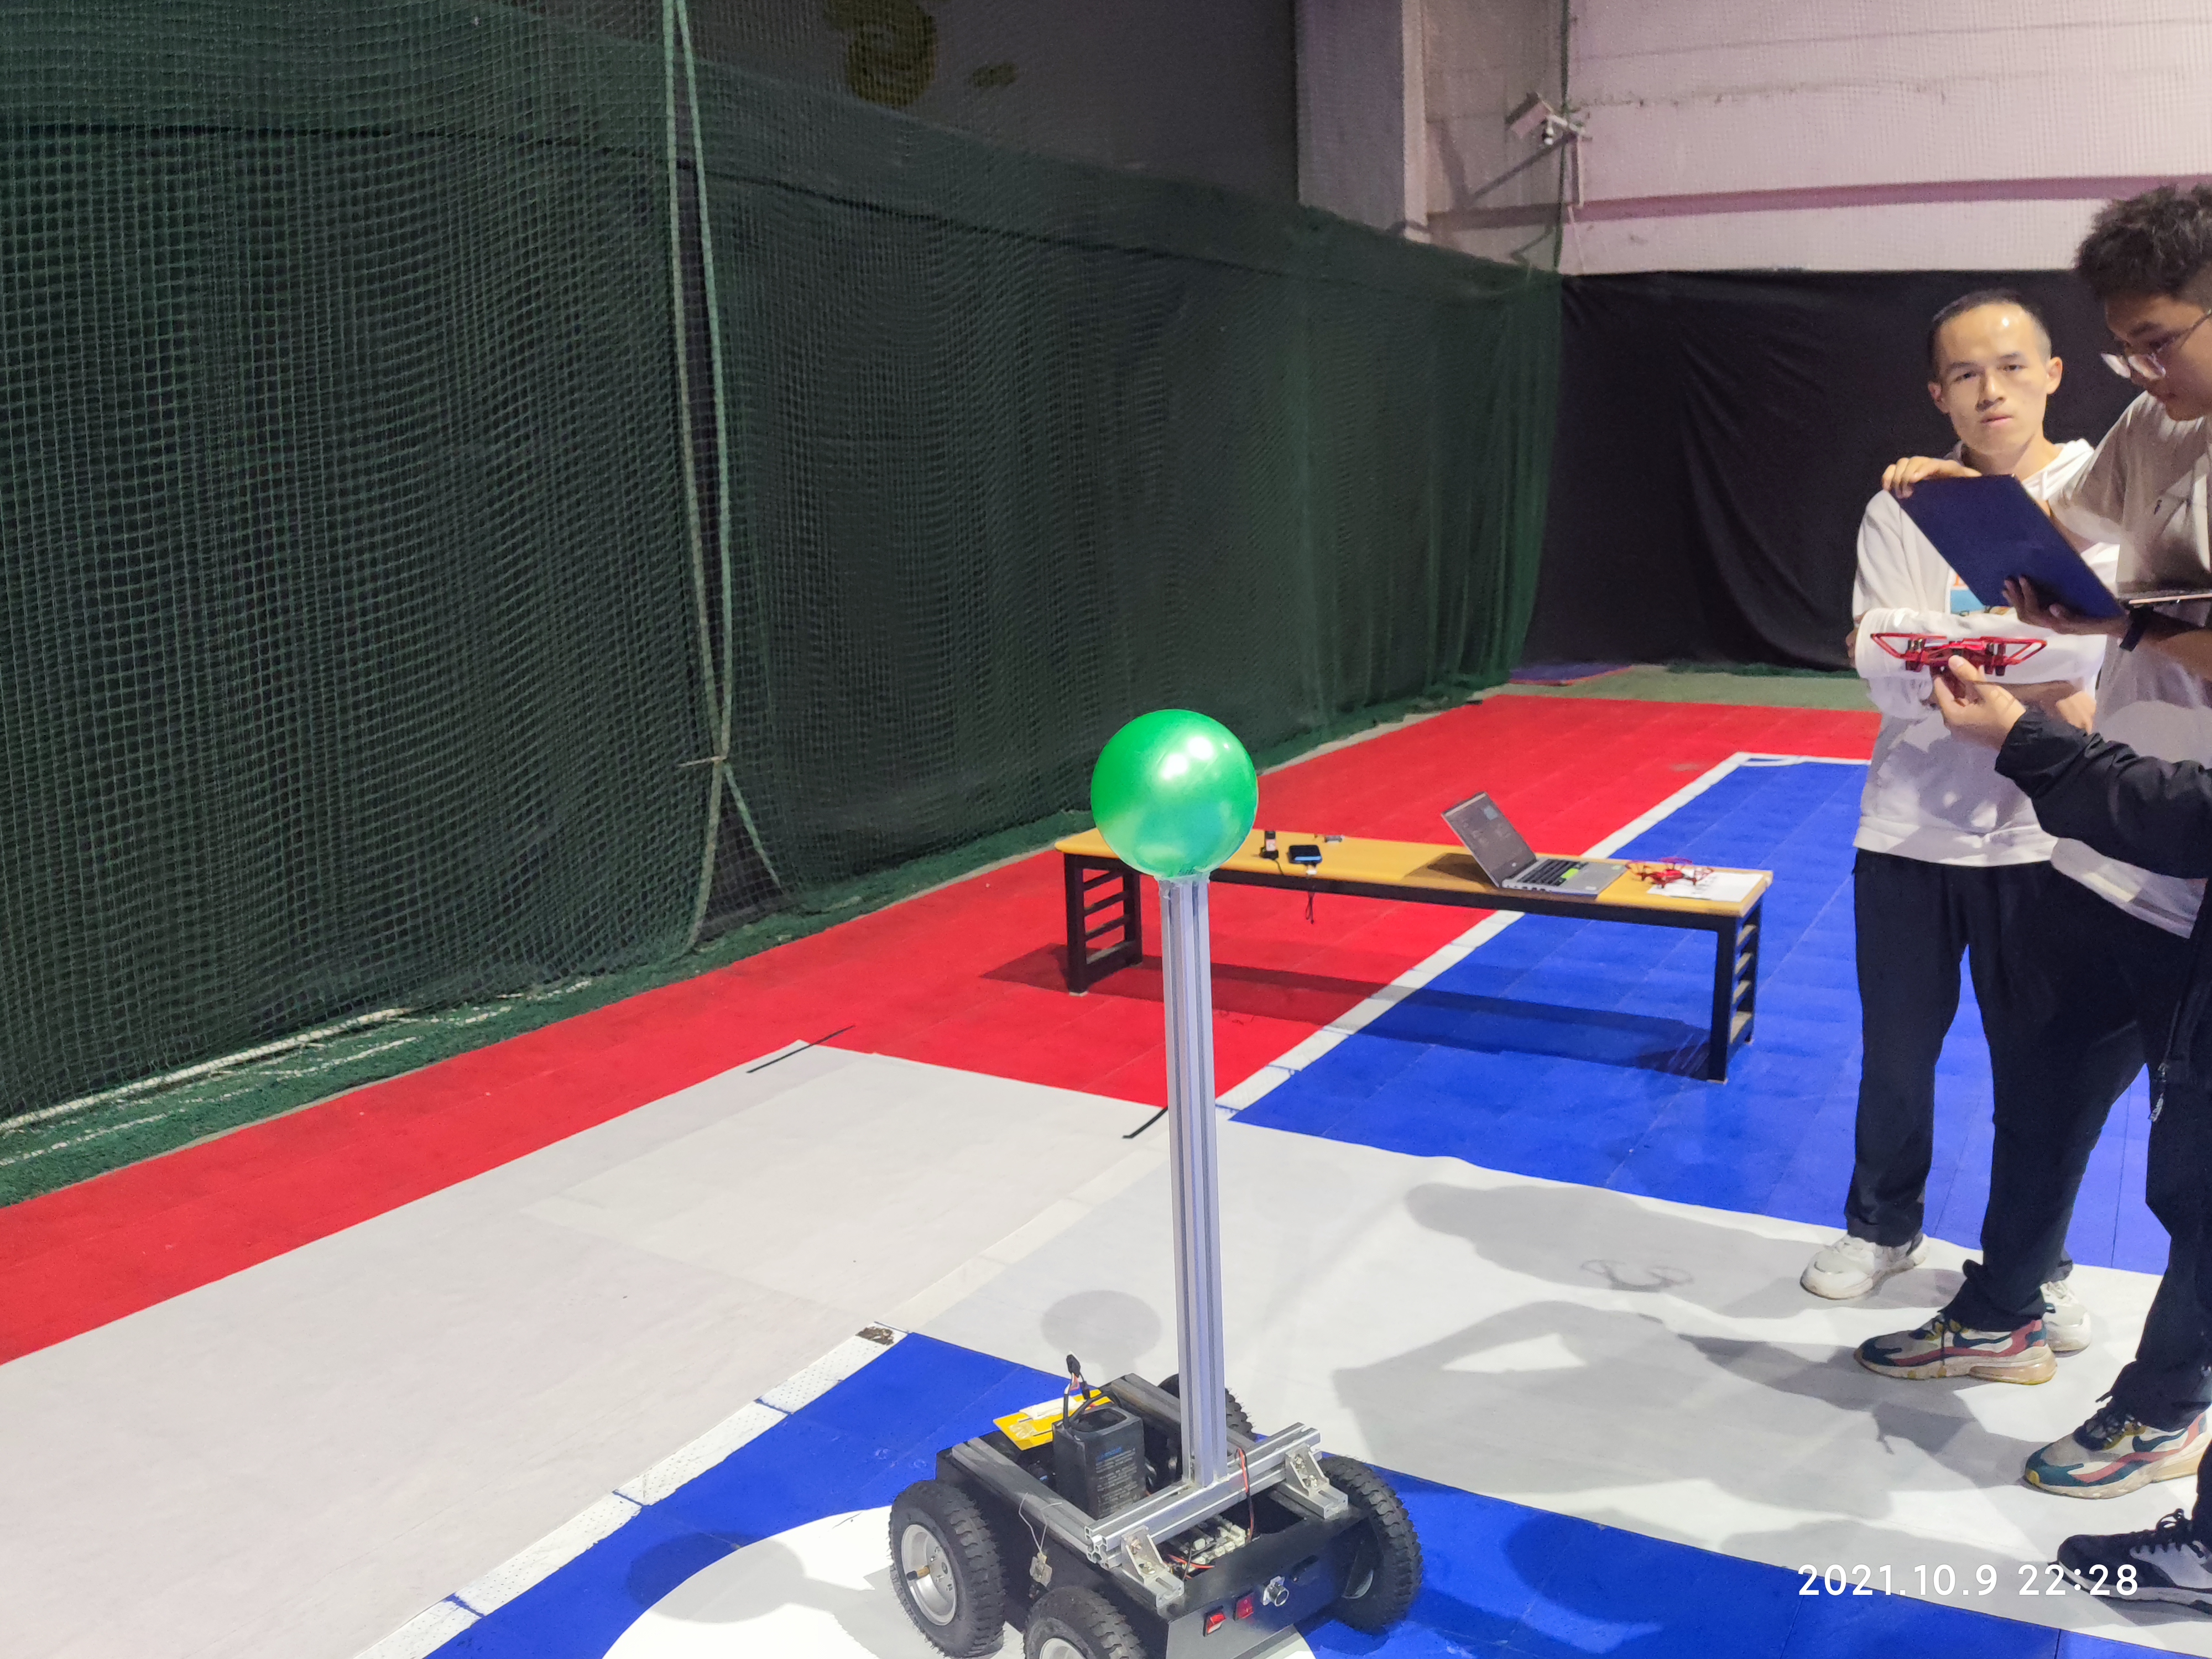
贴一张照片

现场跟踪小球的照片
现场照片

总结

  • 算法简易,仅仅靠颜色来区分目标。但是现场光线对颜色的影响很大,算法稳定性低。
  • 于队友合作失败,一个人完成所有代码编写工作。